


Whonix for Windows, macOS, Linux inside VirtualBox

Getting started with Whonix in 4 simple steps.

GUI
- Whonix with LXQt graphical user interface (GUI).
- This version of Whonix is designed to run inside VirtualBox.
- Beginner-friendly and easy to use.
- It is the right choice for most users.
Please follow these steps to install Whonix LXQt for VirtualBox.
![]() This page is fully functional without JavaScript, but enabling JavaScript significantly enhances the user experience.
This page is fully functional without JavaScript, but enabling JavaScript significantly enhances the user experience.
1 Download Whonix LXQt
Whonix LXQt is available for Windows, MacOS and Linux.

stable LXQt
Optional: Digital signature verification.
Version (stable): 18.2.1.9
Only experienced users: This step is only useful and recommended for very experienced users. All other users please skip this step.
- Digital signatures are a tool enhancing download security. They are commonly used across the internet and nothing special to worry about.
- Optional, not required: Digital signatures are optional and not mandatory for using Whonix, but an extra security measure for advanced users. If you've never used them before, it might be overwhelming to look into them at this stage. Just ignore them for now.
- Learn more: Curious? If you are interested in becoming more familiar with advanced computer security concepts, you can learn more about digital signatures here: Verifying Software Signatures
Read Verify the images to learn more about the verification process for the images.

testers LXQt
Optional: Digital signature verification.
Version (testers): 18.1.4.2
Only experienced users: This step is only useful and recommended for very experienced users. All other users please skip this step.
- Digital signatures are a tool enhancing download security. They are commonly used across the internet and nothing special to worry about.
- Optional, not required: Digital signatures are optional and not mandatory for using Whonix, but an extra security measure for advanced users. If you've never used them before, it might be overwhelming to look into them at this stage. Just ignore them for now.
- Learn more: Curious? If you are interested in becoming more familiar with advanced computer security concepts, you can learn more about digital signatures here: Verifying Software Signatures
Read Verify the images to learn more about the verification process for the images.
2 Install VirtualBox
Download and install VirtualBox for your operating system.

Windows
Microsoft Visual C++ 2019 Redistributable Package
If you see the following error message:
Figure: Microsoft Visual C++ 2019 Redistributable Package Error

Oracle VM VirtualBox needs Microsoft Visual C++ 2019 Redistributable package installed first. Please install and restart the installation of Oracle VM VirtualBox.
Microsoft Visual C++ 2019 Redistributable Package must be installed. [1]
Optional: Digital signature verification.
VirtualBox for Windows is not signed with OpenPGP / gpg. It is signed with authenticode.
After downloading the VirtualBox installer exe and starting it, the user should verify that Verified publisher: is Oracle Corporation.
Figure: Windows signature signature verification window for VirtualBox

Advanced users might wish to learn more about ![]() Authenticode (Windows Digital Software Signatures)
Authenticode (Windows Digital Software Signatures)![]() to perform a deeper verification.
to perform a deeper verification.

macOS
Select your hardware platform.
Apple Silicon
![]()
- Developers only: At time of writing, running Whonix on Apple Silicon is still for developers only!
- No downloadable Whonix image available yet: Whonix for VirtualBox OVA is not yet available for Apple Silicon-based systems.
- Download link above not functional: The download link above will not be functional. It is for Intel/AMD64-based computers only.
- See also: macOS
Optional: Digital signature verification.
VirtualBox for macOS is not signed with OpenPGP / gpg. It is notarized for macOS's gatekeeper.
See also Apple's official documentation Safely open apps on your Mac![]()
![]() .
.

Ubuntu
For Ubuntu host operating systems
Choose an option from the following table. Choose either Option (A) OR Option (B).
A Automated VirtualBox Installation : Ubuntu users could alternatively use the Whonix Linux Installer for VirtualBox. In this case, this wiki page can be completely ignored. No other steps from this wiki page need to be applied because the automated installer will handle everything.
B Manual VirtualBox Installation : Follow the instructions below.
Tested on October 2022 using Ubuntu version 22.04. Older versions are not recommended.

Command Line (All Users)
1 On the host : Open a terminal.
2 Update the package lists.
sudo apt update
3 Install VirtualBox and Linux kernel headers.
sudo apt install --no-install-recommends virtualbox-qt linux-headers-generic
4 Add your current user to group vboxusers. [2]
sudo adduser $(whoami) vboxusers
5 Prevent KVM from conflicting with VirtualBox.
This is necessary if your system uses Linux 6.12 or higher.
echo 'options kvm enable_virt_at_load=0' | sudo tee /etc/modprobe.d/disable-kvm-virt-at-load.conf
6 Reboot.
To ensure KVM configuration takes effect.
7 Done.
The procedure of installing the VirtualBox host software is complete.
Software Center (only if not using SecureBoot)
Ubuntu Software Center can be used to install VirtualBox. The process is similar to installation of most other applications.
This only works for users with computers that do not have "![]() Secure Boot
Secure Boot![]() " enabled. If the user's computer is using "SecureBoot" the user need to either disable "SecureBoot" in the BIOS or use the command line based instructions. [3]
" enabled. If the user's computer is using "SecureBoot" the user need to either disable "SecureBoot" in the BIOS or use the command line based instructions. [3]
1 Open the start menu.
2 Click on the Ubuntu Software Center icon.
Figure: Ubuntu Software Center icon
![]()
3 Click on the magnifying glass to search. → Type virtualbox. → Press enter. → In the search results, click on VirtualBox.
Figure: Ubuntu Software Center - Search For VirtualBox

4 Click on Install and wait.
Figure: Ubuntu Software Center Search Result

5 Installation of VirtualBox has been completed.
When the installation has completed, the install icon changes to the uninstall icon. Do not click the uninstall button.
Figure: Ubuntu Software Center - VirtualBox has been installed

6 Click on Show Applications. → Click on Virtual Box to start the VirtualBox graphical user interface (GUI).
Figure: Ubuntu Software Center #4

7 Prevent KVM from conflicting with VirtualBox.
This is necessary if your system uses Linux 6.12 or higher.
echo 'options kvm enable_virt_at_load=0' | sudo tee /etc/modprobe.d/disable-kvm-virt-at-load.conf
8 Reboot.
To ensure KVM configuration takes effect.
9 Done.
The procedure of installing and starting VirtualBox is complete.

Debian
For Debian host operating systems Choose an option from the following table. Choose either Option (A) OR Option (B).
A Automated VirtualBox Installation : Debian users could alternatively use the Whonix Linux Installer for VirtualBox. In this case, this wiki page can be completely ignored. No other steps from this wiki page need to be applied because the automated installer will handle everything.
B Manual VirtualBox Installation : Follow the instructions below.
Select your Debian release below to get the matching instructions.
Debian Bookworm (oldstable) or Bullseye (oldoldstable)
To acquire the Recommended VirtualBox version tested with Whonix, package virtualbox-qt should be installed from Debian fasttrack repository![]()
![]() according to the following instructions. [4]
according to the following instructions. [4]
1 On the host : Open a terminal.
2 Update the package lists.
sudo apt update
3 Install the Debian fasttrack signing key.
sudo apt install --no-install-recommends fasttrack-archive-keyring
4 Add the Debian fasttrack repository.
echo 'Types: deb URIs: https://fasttrack.debian.net/debian/ Suites: trixie-fasttrack Components: main contrib non-free Enabled: yes Signed-By: /usr/share/keyrings/fasttrack-archive-keyring.gpg' | sudo tee /etc/apt/sources.list.d/fasttrack.sources
5 Add the Debian backports repository. [5]
echo 'Types: deb URIs: https://deb.debian.org/debian Suites: trixie-backports Components: main contrib non-free Enabled: yes Signed-By: /usr/share/keyrings/debian-archive-keyring.gpg' | sudo tee /etc/apt/sources.list.d/backports.sources
6 Update the package lists again. [6]
sudo apt update
7 Install VirtualBox and Linux kernel headers.
sudo apt install --no-install-recommends virtualbox-qt linux-headers-$(dpkg --print-architecture)
8 Add your current user to group vboxusers. [2]
sudo adduser $(whoami) vboxusers
9 Done.
The procedure of installing the VirtualBox host software is complete.
Debian trixie (stable) or Testing
Debian Unstable
VirtualBox can be installed by adding the Debian unstable (sid) repository.
1. Update your package lists.
sudo apt update
2. Install VirtualBox and Linux headers, which are a dependency.
sudo apt install --no-install-recommends virtualbox-qt linux-headers-$(dpkg --print-architecture)
3. Add your Linux user account to Linux user group vboxusers.
sudo adduser $(whoami) vboxusers
The details of this are unspecific to Whonix and undocumented.
Other Debian Releases
Other Debian releases might work, but this is untested. In case of other Debian release:
Kicksecure
Kicksecure™ host operating systems
Choose an option from the following table. Choose either Option (A) OR Option (B).
A Automated VirtualBox Installation : Kicksecure™ users could alternatively use the Whonix Linux Installer for VirtualBox. In this case, this wiki page can be completely ignored. No other steps from this wiki page need to be applied because the automated installer will handle everything.
B Manual VirtualBox Installation : Follow the instructions below.

Linux
Hosts using a non-Debian operating system:
- Install VirtualBox as per the normal mechanism for your Linux distribution. No special instructions for Whonix are required. The installation of a recent VirtualBox host software is unspecific to Whonix. Consult the documentation of your Linux distribution.
- You may need to disable KVM's "enable virt at load" feature if your system uses kernel 6.12 or later. This will prevent KVM from taking over virtualization-related features on the system automatically. This will not prevent KVM virtual machines from being used. Add
kvm.enable_virt_on_load=0to your system's kernel command line, or addoptions kvm enable_virt_at_load=0to your system's modprobe configuration, using the appropriate mechanism for your distribution. - Whonix has been tested with, expects VirtualBox version
latest. - For example the outdated VirtualBox version
5.2.18is incompatible.
![]() General recommendations for users using Linux as a host operating system:
General recommendations for users using Linux as a host operating system:
Linux kernel version:
- The recommended host Linux kernel version is the same version that Debian
trixieis using, seelinux-image-amd64
 .
. - Newer host Linux kernel versions are likely to break VirtualBox VMs in many ways since these are unsupported by VirtualBox. [7]
Host operating system. The recommended host Linux distributions are:
- preferably the stable version of Kicksecure™
18, or - Debian Linux version
trixie.
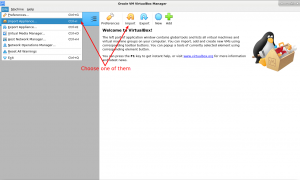
3 Import Whonix into VirtualBox
For Whonix VirtualBox import instructions, please press the learn more button on the right.
Follow these steps to import Whonix into VirtualBox. Click images to enlarge
-
 1 Start VirtualBox
 -
 2 Click on File then choose Import Appliance...
 -
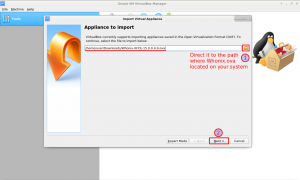 3 Navigate and select Whonix image and press next
 -
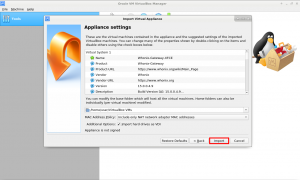 4 Do NOT change anything! Just click on Import
 -
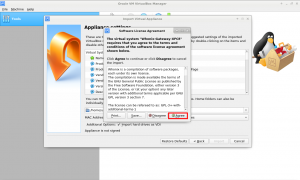 5 Then press Agree
 -
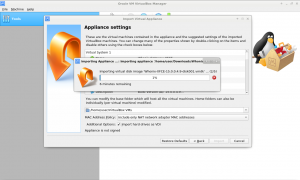 6 Wait until Whonix
.ovahas been imported -
 7 Now start Whonix-Gateway and Whonix-Workstation


Miscellaneous
There are also Video Tutorials.
If you still need help, please check the Support page.
For optional, alternative command line import instructions, see VirtualBox, manual VM import.
4 Start Whonix
Starting Whonix is simple:
- Start VirtualBox.
- Double-click the Whonix-Gateway™ and Whonix-Workstation™.
CLI

- Whonix with command line interface (CLI).
- This version of Whonix is designed to run inside VirtualBox.
- Whonix with CLI is a version suited for advanced users -- those who want Whonix without a graphical user interface (GUI). Everyone else should install the user-friendly Whonix VirtualBox with GUI LXQt.
Please follow these steps to install Whonix CLI for VirtualBox.
![]() This page is fully functional without JavaScript, but enabling JavaScript significantly enhances the user experience.
This page is fully functional without JavaScript, but enabling JavaScript significantly enhances the user experience.
1 Download Whonix CLI
Whonix CLI is available for Windows, MacOS and Linux.
stable CLI
Optional: Digital signature verification.
Version (stable): 18.2.1.9
Only experienced users: This step is only useful and recommended for very experienced users. All other users please skip this step.
- Digital signatures are a tool enhancing download security. They are commonly used across the internet and nothing special to worry about.
- Optional, not required: Digital signatures are optional and not mandatory for using Whonix, but an extra security measure for advanced users. If you've never used them before, it might be overwhelming to look into them at this stage. Just ignore them for now.
- Learn more: Curious? If you are interested in becoming more familiar with advanced computer security concepts, you can learn more about digital signatures here: Verifying Software Signatures
Read Verify the images to learn more about the verification process for the images.
testers CLI
Optional: Digital signature verification.
Version (testers): 18.1.4.2
Only experienced users: This step is only useful and recommended for very experienced users. All other users please skip this step.
- Digital signatures are a tool enhancing download security. They are commonly used across the internet and nothing special to worry about.
- Optional, not required: Digital signatures are optional and not mandatory for using Whonix, but an extra security measure for advanced users. If you've never used them before, it might be overwhelming to look into them at this stage. Just ignore them for now.
- Learn more: Curious? If you are interested in becoming more familiar with advanced computer security concepts, you can learn more about digital signatures here: Verifying Software Signatures
Read Verify the images to learn more about the verification process for the images.
2 Install VirtualBox
Download and install VirtualBox for your operating system.
Windows
Microsoft Visual C++ 2019 Redistributable Package
If you see the following error message:
Figure: Microsoft Visual C++ 2019 Redistributable Package Error
Oracle VM VirtualBox needs Microsoft Visual C++ 2019 Redistributable package installed first. Please install and restart the installation of Oracle VM VirtualBox.
Microsoft Visual C++ 2019 Redistributable Package must be installed. [8]
Optional: Digital signature verification.
VirtualBox for Windows is not signed with OpenPGP / gpg. It is signed with authenticode.
After downloading the VirtualBox installer exe and starting it, the user should verify that Verified publisher: is Oracle Corporation.
Figure: Windows signature signature verification window for VirtualBox
Advanced users might wish to learn more about ![]() Authenticode (Windows Digital Software Signatures)
Authenticode (Windows Digital Software Signatures)![]() to perform a deeper verification.
to perform a deeper verification.
macOS
Select your hardware platform.
Apple Silicon
![]()
- Developers only: At time of writing, running Whonix on Apple Silicon is still for developers only!
- No downloadable Whonix image available yet: Whonix for VirtualBox OVA is not yet available for Apple Silicon-based systems.
- Download link above not functional: The download link above will not be functional. It is for Intel/AMD64-based computers only.
- See also: macOS
Optional: Digital signature verification.
VirtualBox for macOS is not signed with OpenPGP / gpg. It is notarized for macOS's gatekeeper.
See also Apple's official documentation Safely open apps on your Mac![]()
![]() .
.
Ubuntu
For Ubuntu host operating systems
Choose an option from the following table. Choose either Option (A) OR Option (B).
A Automated VirtualBox Installation : Ubuntu users could alternatively use the Whonix Linux Installer for VirtualBox. In this case, this wiki page can be completely ignored. No other steps from this wiki page need to be applied because the automated installer will handle everything.
B Manual VirtualBox Installation : Follow the instructions below.
Tested on October 2022 using Ubuntu version 22.04. Older versions are not recommended.
Command Line (All Users)
1 On the host : Open a terminal.
2 Update the package lists.
sudo apt update
3 Install VirtualBox and Linux kernel headers.
sudo apt install --no-install-recommends virtualbox-qt linux-headers-generic
4 Add your current user to group vboxusers. [2]
sudo adduser $(whoami) vboxusers
5 Prevent KVM from conflicting with VirtualBox.
This is necessary if your system uses Linux 6.12 or higher.
echo 'options kvm enable_virt_at_load=0' | sudo tee /etc/modprobe.d/disable-kvm-virt-at-load.conf
6 Reboot.
To ensure KVM configuration takes effect.
7 Done.
The procedure of installing the VirtualBox host software is complete.
Software Center (only if not using SecureBoot)
Ubuntu Software Center can be used to install VirtualBox. The process is similar to installation of most other applications.
This only works for users with computers that do not have "![]() Secure Boot
Secure Boot![]() " enabled. If the user's computer is using "SecureBoot" the user need to either disable "SecureBoot" in the BIOS or use the command line based instructions. [9]
" enabled. If the user's computer is using "SecureBoot" the user need to either disable "SecureBoot" in the BIOS or use the command line based instructions. [9]
1 Open the start menu.
2 Click on the Ubuntu Software Center icon.
Figure: Ubuntu Software Center icon
![]()
3 Click on the magnifying glass to search. → Type virtualbox. → Press enter. → In the search results, click on VirtualBox.
Figure: Ubuntu Software Center - Search For VirtualBox
4 Click on Install and wait.
Figure: Ubuntu Software Center Search Result
5 Installation of VirtualBox has been completed.
When the installation has completed, the install icon changes to the uninstall icon. Do not click the uninstall button.
Figure: Ubuntu Software Center - VirtualBox has been installed
6 Click on Show Applications. → Click on Virtual Box to start the VirtualBox graphical user interface (GUI).
Figure: Ubuntu Software Center #4
7 Prevent KVM from conflicting with VirtualBox.
This is necessary if your system uses Linux 6.12 or higher.
echo 'options kvm enable_virt_at_load=0' | sudo tee /etc/modprobe.d/disable-kvm-virt-at-load.conf
8 Reboot.
To ensure KVM configuration takes effect.
9 Done.
The procedure of installing and starting VirtualBox is complete.
Debian
For Debian host operating systems Choose an option from the following table. Choose either Option (A) OR Option (B).
A Automated VirtualBox Installation : Debian users could alternatively use the Whonix Linux Installer for VirtualBox. In this case, this wiki page can be completely ignored. No other steps from this wiki page need to be applied because the automated installer will handle everything.
B Manual VirtualBox Installation : Follow the instructions below.
Select your Debian release below to get the matching instructions.
Debian Bookworm (oldstable) or Bullseye (oldoldstable)
To acquire the Recommended VirtualBox version tested with Whonix, package virtualbox-qt should be installed from Debian fasttrack repository![]()
![]() according to the following instructions. [10]
according to the following instructions. [10]
1 On the host : Open a terminal.
2 Update the package lists.
sudo apt update
3 Install the Debian fasttrack signing key.
sudo apt install --no-install-recommends fasttrack-archive-keyring
4 Add the Debian fasttrack repository.
echo 'Types: deb URIs: https://fasttrack.debian.net/debian/ Suites: trixie-fasttrack Components: main contrib non-free Enabled: yes Signed-By: /usr/share/keyrings/fasttrack-archive-keyring.gpg' | sudo tee /etc/apt/sources.list.d/fasttrack.sources
5 Add the Debian backports repository. [11]
echo 'Types: deb URIs: https://deb.debian.org/debian Suites: trixie-backports Components: main contrib non-free Enabled: yes Signed-By: /usr/share/keyrings/debian-archive-keyring.gpg' | sudo tee /etc/apt/sources.list.d/backports.sources
6 Update the package lists again. [12]
sudo apt update
7 Install VirtualBox and Linux kernel headers.
sudo apt install --no-install-recommends virtualbox-qt linux-headers-$(dpkg --print-architecture)
8 Add your current user to group vboxusers. [2]
sudo adduser $(whoami) vboxusers
9 Done.
The procedure of installing the VirtualBox host software is complete.
Debian trixie (stable) or Testing
Debian Unstable
VirtualBox can be installed by adding the Debian unstable (sid) repository.
1. Update your package lists.
sudo apt update
2. Install VirtualBox and Linux headers, which are a dependency.
sudo apt install --no-install-recommends virtualbox-qt linux-headers-$(dpkg --print-architecture)
3. Add your Linux user account to Linux user group vboxusers.
sudo adduser $(whoami) vboxusers
The details of this are unspecific to Whonix and undocumented.
Other Debian Releases
Other Debian releases might work, but this is untested. In case of other Debian release:
Kicksecure
Kicksecure™ host operating systems
Choose an option from the following table. Choose either Option (A) OR Option (B).
A Automated VirtualBox Installation : Kicksecure™ users could alternatively use the Whonix Linux Installer for VirtualBox. In this case, this wiki page can be completely ignored. No other steps from this wiki page need to be applied because the automated installer will handle everything.
B Manual VirtualBox Installation : Follow the instructions below.
Linux
Hosts using a non-Debian operating system:
- Install VirtualBox as per the normal mechanism for your Linux distribution. No special instructions for Whonix are required. The installation of a recent VirtualBox host software is unspecific to Whonix. Consult the documentation of your Linux distribution.
- You may need to disable KVM's "enable virt at load" feature if your system uses kernel 6.12 or later. This will prevent KVM from taking over virtualization-related features on the system automatically. This will not prevent KVM virtual machines from being used. Add
kvm.enable_virt_on_load=0to your system's kernel command line, or addoptions kvm enable_virt_at_load=0to your system's modprobe configuration, using the appropriate mechanism for your distribution. - Whonix has been tested with, expects VirtualBox version
latest. - For example the outdated VirtualBox version
5.2.18is incompatible.
![]() General recommendations for users using Linux as a host operating system:
General recommendations for users using Linux as a host operating system:
Linux kernel version:
- The recommended host Linux kernel version is the same version that Debian
trixieis using, seelinux-image-amd64. - Newer host Linux kernel versions are likely to break VirtualBox VMs in many ways since these are unsupported by VirtualBox. [13]
Host operating system. The recommended host Linux distributions are:
- preferably the stable version of Kicksecure™
18, or - Debian Linux version
trixie.
3 Import Whonix into VirtualBox
For Whonix VirtualBox import instructions, please press the learn more button on the right.
Follow these steps to import Whonix into VirtualBox. Click images to enlarge
-
1 Start VirtualBox
-
2 Click on File then choose Import Appliance...
-
3 Navigate and select Whonix image and press next
-
4 Do NOT change anything! Just click on Import
-
5 Then press Agree
-
6 Wait until Whonix
.ovahas been imported -
7 Now start Whonix-Gateway and Whonix-Workstation
Miscellaneous
There are also Video Tutorials.
If you still need help, please check the Support page.
For optional, alternative command line import instructions, see VirtualBox, manual VM import.
4 Start Whonix
Starting Whonix is simple:
- Start VirtualBox.
- Double-click the Whonix-Gateway™ and Whonix-Workstation™.
First Time User / Questions and Answers
First Time User / Questions and Answers
[edit]![]()
- Default username: user
- Default password: No password required. (Passwordless login.) [14]
- Can I combine Whonix-Gateway™ CLI with Whonix-Workstation™ LXQt? Yes, you can! Learn more.
- Why use VirtualBox over KVM?
- Why use VirtualBox over Qubes?
- FAQ
See Also
See Also
[edit]- Documentation
- Follow Whonix Developments
- In case of issues, see VirtualBox Troubleshooting.
For additional VirtualBox guides and information, please press on expand on the right.
- Known Issues
- VirtualBox Troubleshooting
- VirtualBox Guest Additions
- VirtualBox Clipboard Sharing
- VirtualBox Shared Folder
- VirtualBox Hardening
- Installing Newer Versions of VirtualBox
Help Wanted
- Work on the VirtualBox development task list.
Footnotes
Footnotes
[edit]- ↑
This link has been found on the
microsoft.comwebsite: Microsoft Visual C++ Redistributable latest supported downloads
- ↑ 2.0 2.1 2.2 2.3
Optional: See: https://www.virtualbox.org/manual/ch02.html#install-linux-vboxusers
Also spams
~/.config/VirtualBox/VBoxSVC.loglog if not done. - ↑
This is unspecific to Whonix. This is because during package installation of a package that requires kernel modules when "SecureBoot" is enabled, Ubuntu's
dkmsis prompting the user for a password to encrypt the key which will be used to enroll the kernel module signing key. This is Ubuntu usability issue. It is unknown if any bug report / feature request for this exists. Please contribute, research, report this issue on Ubuntu's issue tracker. - ↑
This is
 non-ideal
 but required since VirtualBox in unavailable in official Debian
 trixierepository and difficult to install due to VirtualBox Installation Challenges. Alternatively you could install VirtualBox from the Oracle (virtualbox.org) Repository, but this comes with different risks. VirtualBox might be updated by VirtualBox developers before being tested with Whonix which could then lead to issues. (Described in footnote Recommended Version.) - ↑
This is required because the Debian
fasttrackrepository depends on the Debianbackportsrepository. - ↑
This is to acquire the Debian
fasttrackrepository package sources. - ↑
https://www.virtualbox.org/ticket/17055#comment:3
- ↑
This link has been found on the
microsoft.comwebsite: Microsoft Visual C++ Redistributable latest supported downloads
- ↑
This is unspecific to Whonix. This is because during package installation of a package that requires kernel modules when "SecureBoot" is enabled, Ubuntu's
dkmsis prompting the user for a password to encrypt the key which will be used to enroll the kernel module signing key. This is Ubuntu usability issue. It is unknown if any bug report / feature request for this exists. Please contribute, research, report this issue on Ubuntu's issue tracker. - ↑
This is non-ideal but required since VirtualBox in unavailable in official Debian
trixierepository and difficult to install due to VirtualBox Installation Challenges. Alternatively you could install VirtualBox from the Oracle (virtualbox.org) Repository, but this comes with different risks. VirtualBox might be updated by VirtualBox developers before being tested with Whonix which could then lead to issues. (Described in footnote Recommended Version.) - ↑
This is required because the Debian
fasttrackrepository depends on the Debianbackportsrepository. - ↑
This is to acquire the Debian
fasttrackrepository package sources. - ↑
https://www.virtualbox.org/ticket/17055#comment:3
- ↑
Rationale for Change from Default Password changeme to Empty Default Password


We believe security software like Whonix needs to remain Open Source and independent. Would you help sustain and grow the project? Learn more about our 14 year success story and maybe DONATE!